Saturday, 7 May 2016

Capturing the Little Things With a Digital Camera

Have you ever wondered how a photographer gets such clear, detailed photos of things like flowers or insects?  Capturing such close-up pictures is most often done with a setting that comes as an option on many digital cameras--the macro setting.  

What the macro setting on your camera essentially does is focus on a very small area.  The background often appears unfocused to further bring out your intended subject.  Getting in close to capture all the detail of a small object is nearly impossible with the regular setting on a camera.  Anything closer than about three feet becomes blurred.  The macro setting changes the distance your camera will be able to focus and often allows you to take clear pictures from as close as two or three inches.

This camera mode allows for a lot of experimenting.  Try taking a picture of a bee sitting on a flower petal or a close-up of frost on the window.  You will be amazed at the details brought out.  You will be able to almost feel the furriness of the bee and the ice crystals are beautiful.

If you are planning to sell at online auctions, a macro setting on your camera will help with taking better pictures--and better pictures help with sales.  You can take close-up photos of such objects as stamps and coins, show the engraving on an object or allow a viewer to see that a piece of jewelry is flawless.  

Don’t save your photo taking for big events exclusively.  Take a walk and notice the little things like the pattern on a tree trunk or an ant carrying a bread crumb twice his size.  There are interesting photos everywhere once you start to look, and the macro mode on your digital camera is the perfect tool for capturing them.

How Many Mega-Pixels Do I Need?

One of the confusing things in choosing a digital camera is deciding how many mega-pixels you should look for.  The answer depends on what you plan on doing with the finished pictures.

First, you need to understand what a pixel is.  In terms of digital prints, a pixel simply means a dot of color that makes up the image.  A mega-pixel is equal to one million pixels.  The more mega-pixels a camera has, the greater the amount of information it records.  

The easiest way to decide what to look for is to know what size prints you are likely to print from your camera.  A one mega-pixel camera is fine for those who don’t plan on printing photos but rather just post them on the internet.  A small print, say 4 x 6, will print acceptably from this camera.

A 2 mega-pixel camera will enable you to produce good quality 5 x 7 prints and fair quality 8 x 10 prints.  When you reach 4 mega-pixels you can print out excellent quality 8 x 10 prints and acceptable 11 x 17 prints and a 5 mega pixel camera will allow you to print out high quality 11 x 17 prints.

Most families find a camera in the 3.2 Mega-pixel range to be the best choice.  The quality of both 5 x & and 8 X 10 prints is very good yet the files on your computer are not so large you need worry about not having enough space.

Any camera over 5 mega-pixels is unnecessary for all but professionals in photography; even then, only those who have need for poster-size prints find that many mega-pixels worth the money.  Most freelance photographers find 4 or 5 mega-pixels to be sufficient for excellent-quality prints.

The choice is yours.  Look to what you plan on doing with your photos and then decide.  In most cases spending the money for increased optical zoom and lower mega-pixels is the best choice.

Focus Modes in Digital Cameras

While some of the least expensive digital cameras have only automatic focus, meaning the camera does all the work on bringing your subject into the best possible focus, most SLR digitals offer three different focus modes:  manual, single auto focus and continuous auto focus.  All three of these will be addressed here.
With manual focus, the camera stays out of the focus equation and you, the photographer, make all the decisions regarding this.  This is done by setting different buttons or actually using an attached focusing ring that rotates on the camera lens.  For those who like to have complete creative control of the finished product, this is the best focus mode.
In single auto focus mode, the camera automatically focuses when you press the shutter button either all the way down to shoot a photo or half way down to lock the focus.  This mode is useful when shooting static objects. 
In continuous auto focus the camera continuously focuses on the objects in the photo.  In this mode the camera continuously corrects the focus as the objects distance from the camera changes. This mode is useful when you shoot photos of moving objects such as a race car during a race or airplanes during an air show. You can hold the shutter button half way down and continuously move the camera to follow the object. The camera will continuously keep the object in focus. 
Like any other feature automatic and manual focus modes have their pros and cons. The first step to using them to your advantage is to understand how they work and what they were designed for. The next step is to experiment shoot photos using different focus modes and different types of objects and see how the camera behaves. Once you have done that you will be ready to instinctively use the best focus mode for each photo situation.

Digital Zoom Versus Optical Zoom

Many digital cameras offer both digital and optical zoom.  These two often confuse the average camera buyer, until you know what you’re looking at.

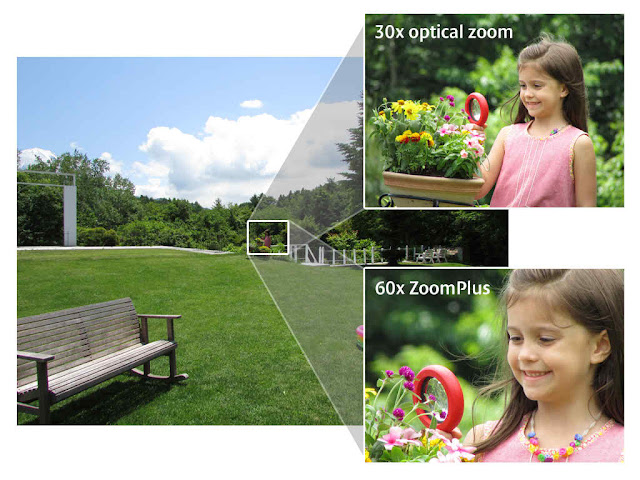
Optical zoom works much like the zoom lens on a 35 mm film camera. It changes the length of your camera’s lens and draws the subject closer to you.  The optical zoom keeps the quality of the picture. Digital zoom works differently. It simply takes the picture and crops it then enlarges the part that is left.  It causes the quality of the photo to be reduced, sometimes greatly.

What this means in terms of output is you may have a larger view of an object with the digital zoom, but chances are your image will become unfocused.  Details will become lost.  It is actually best to turn off the digital zoom feature of your camera if possible.  This will prevent you automatically zooming in too close as the digital zoom is often an extension of the optical.

There are a couple of things you can do if you want a closer view of a subject but want the quality of your picture to still be good.  Try moving in closer when you take the picture.  Often only a foot or two will do the trick.  If this isn’t possible, you can set your camera to take a picture at its highest file size.  This will result in a photo that can be cropped to include only your desired subject, yet allow for an image that is still clear.

Digital zoom has its place.  It can be used if the only destiny of your photo is the internet.  Photos online can be a much lower quality in the camera and still appear acceptable when sent through e-mail or posted on a web gallery.  If your goal is printing, however, seek a camera that has a greater optical zoom and turn off the digital zoom.  Your pictures will be better in the end, even if they are not as close up.

Digital Camera Terms To Know

It helps when learning to use your new digital camera to also know what some of the more common terms mean.  Below you will find many of these common terms defined..
Automatic Mode — A setting that sets the focus, exposure and white-balance automatically.
Burst Mode or Continuous Capture Mode — a series of pictures taken one after another at quickly timed intervals with one press of the shutter button. 
Compression — The process of compacting digital data, images and text by deleting selected information.
Digital Zoom — Cropping and magnifying the center part of an image.
JPEG — The predominant format used for image compression in digital cameras 
Lag Time — The pause between the time the shutter button is pressed and when the camera actually captures the image

LCD — (Liquid-Crystal Display) is a small screen on a digital camera for viewing images.

Lens — A circular and transparent glass or plastic piece that has the function of collecting light and focusing it on the sensor to capture the image.
Megabyte — (MB) Measures 1024 Kilobytes, and refers to the amount of information in a file, or how much information can
be contained on a Memory Card, Hard Drive or Disk.
Pixels — Tiny units of color that make up digital pictures. Pixels also measure digital resolution. One million pixels
adds up to one mega-pixel.
RGB — Refers to Red, Green, Blue colors used on computers to create all other colors.
Resolution — Camera resolution describes the number of pixels used to create the image, which determines the amount of
detail a camera can capture. The more pixels a camera has, the more detail it can register and the larger the picture can be
printed.
Storage Card — The removable storage device which holds images taken with the camera, comparable to film, but much smaller. Also called a digital camera memory card...
Viewfinder — The optical "window" to look through to compose the scene. 
White Balance — White balancing adjusts the camera to compensate for the type of light (daylight, fluorescent, incandescent, etc.,) or lighting conditions in the scene so it will look normal to the human eye.